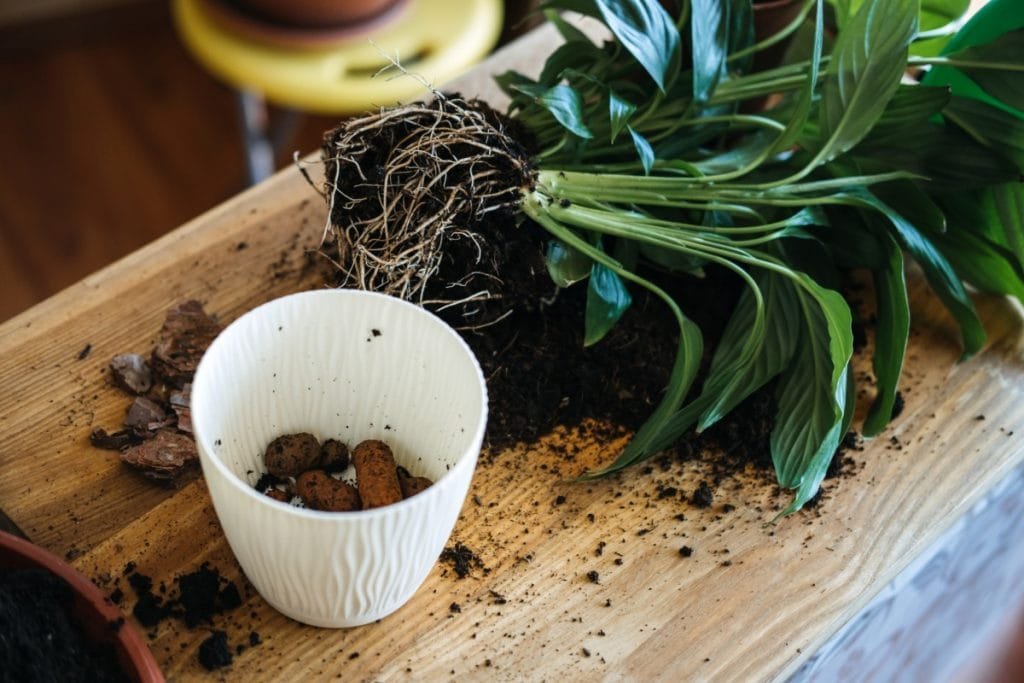
Plants need water to live, but too much water can be just as harmful to your plants as too little. Planters without drainage holes can be especially challenging since it is very easy to overwater and drown your plants. Adding a drainage layer is one way to prevent this problem.
Planters without drainage holes need a drainage layer to allow water to filter through and keep roots from being saturated. Coarse materials such as pebbles, stones, or gravel work well as a drainage layer. Another option is to use the two-pot or two-planter method where one pot is nested in another.
The drainage layer in the planter is to prevent the roots from laying in the water that settled on the bottom. If the water does not drain, or when the roots are not elevated somehow, the roots can become infected by bacteria in the water and cause rot and fungus.

Create Drainage For Your Planters Without Holes
To avoid infection, rot, and fungus, we need to create a drainage layer to keep the roots in prime condition. Luckily, there are many things you can use and plenty of ways to keep those roots elevated.
If you want to know what plants to grow in your pots, check out my article, What Plants Do Well In Plastic Pots?
Using Coarse Materials As Drainage Layers
Adding layers of coarse material is a great way to create a drainage layer. This layer will keep your soil from being over saturated and the roots of the plants from sitting in water.
The coarse material can be made up of stones, pumice, or gravel. Using different sizes and installing a filter between your soil and drainage layers is important to prevent the drainage from becoming clogged with soil.
Adding a drainage layer is simple. I have broken it down into a couple of easy steps.
- You’ll need to look for two different sizes of coarse materials to balance the layers. Going from finer at the bottom to larger in the middle (this will create more space for the water to flow through).
- The finer layer at the bottom will offer better support for the coarser stones in the middle and prevent displacement.
- Next, you need to find a non-toxic filter material like coffee filters to add between the larger stones and the soil on top (this will prevent the dirt from clogging the spaces between the rocks where the water needs to drain through).
- Allow for sufficient layers in case of accidental overwatering while still providing the plants with efficient soil depth for the roots to take hold.
The Pot-in-Pot Method for Adding Drainage
Some experts believe adding stones, pumice, or gravel will not solve the drainage issues of planters without holes. The other way to keep roots out of the water is to use a two-pot or two-planter method.
It’s fairly straightforward; go on the hunt for a container or planter that is wider and taller. The extra length is quite important to ensure you have enough space to add something to the bottom of the additional planter.
Basically, you need two planters than can nest together. The interior planter will need to have drainage holes in the bottom to let the water drain into the larger pot.
Since the interior pot will not be seen, you can use simple containers like the ones that come with your plant. Another option, depending on the size of your plant, is to poke holes in the bottom of a yogurt container. Food containers are a great option since they are made from food safe materials. Using a container that is made of HPDE or PP is great for this. Learn more in my article about what plastics are safe for plants.
You can even get your creative juices flowing by adding stones to the space between the two planters or pots. Not only will it facilitate drainage, but it will create a beautiful border.
However, if you use this method for a big container, using bricks at the bottom and filling the sides with pretty pebbles will make it very hard to move from one place to another. I suggest using a lighter, natural filler like mulch to fill the space between and adding a layer of decorative stones as the final touch.
Using the two-pot method works excellent for indoor plants in decorative pots. It won’t be necessary to remove them from the nursery pots (holes in the bottom). All you have to do is place a few small stones in the decorative pot and put the nursery pot inside. You can fill the space between them with more soil to conceal the unsightly plastic container.
Self Watering Planters as an Alternative to Drainage Layers
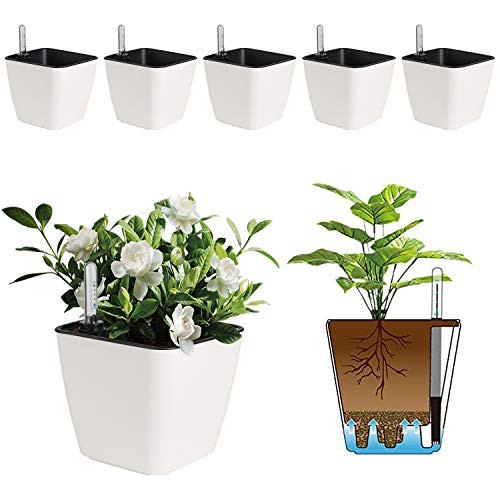
If you don’t already have your heart set on a specific planter then buying a self-watering planter is a great way to prevent both underwatering and overwatering. If you already have a planter you love you can easily convert it to a self-watering system.
Self-watering planters work by having a reservoir in the bottom, a way to wick water into the soil, and a water level indicator. All you need to do is water your plant and once the indicator shows that the reservoir is full you stop watering. Your plant will take the water it needs as it needs it. Once the soil seems dried out or the water level indicator shows it is low, then you simply water the plant again.
- Self-Watering System: The planter has a self-watering system that allows you to water your...
- Planter with Liner: The planter has a liner that captures excess water and allows it to be...
- Small Square Planter: The planter is a small square size that is perfect for holding orchids,...
If you’d like to DIY check out this video on how to make your own. I’ve done it before on a large scale creating a self-watering raised bed using an 8 foot kids pool.
Are Drainage Layers Failproof?
Unfortunately, drainage layers are not failproof. Giving your plants too much water can be detrimental, even with a drainage layer. To keep your plants healthy, make sure you maintain the correct moisture level for the type of plant and where the plant is kept.
Indoor plants that are primarily in the shade will not need to be watered daily, only when you notice that the surface soil is drying out, and only add enough water to keep it moist.
If you have a drainage layer, this also does not mean you can go crazy with the H2O. If the water level settles above the layer, the roots will still be submerged – and that is what we want to avoid.
One way to avoid overwatering your plants is to use a soil moisture meter. Simply insert to probe into the soil to see if you plant needs watering.
- Accurate Soil Moisture Detection:The XLUX Soil Moisture Meter can tell you if the soil deep...
- Easy-to-Read Large Dial: The large dial is easy to read and includes three zones with ten...
- Immediate Moisture Reading: Insert the probe into the soil, and without waiting, the dial will...
Do All Plants Need Drainage Holes Or Layers?
Proper drainage is important for most plants to survive. Many types of plants can withstand neglect and underwatering. Most plants are sensitive to overwatering since it can lead to root rot which is difficult to save your plant from.
However, other plants are hardy and can withstand even extreme neglect. If you don’t have the aptitude for gardening and keep forgetting to add drainage layers to your planters, we suggest changing the plants instead.
Here are the top twenty indoor and outdoor plants that you can plant without drainage holes.
| No drainage layers/holes required | Drought resistant plants |
| Schefflera | Bougainvillea |
| Chinese evergreen | Sage |
| Kupukupu fern | Lantana |
| Pothos | Geranium |
| Crotons | Lavender |
| Dumbcane | Adenium |
| Snake plant | Cactus |
| Spider plant | Portulaca |
| Succulents | Agaves |
| Cordyline | Yarrow |
These plants work great for planters without holes because they don’t require much water. Your flora will be just fine if the soil stays moist and not fully saturated with water.
Final Thoughts
At first, drainage issues might sound like a nightmare to fix, but simply adding a drainage layer or additional container to your planter are easy fixes, and you should have happy plants in no time.
Just remember to not drown your plants, even with a drainage layer. Overwatered plants can per harder to save than underwatered plants.


